Tuesday 29 January 2013

Intro to still life drawing


What a rainy weekend we've just had. Normally I'm not a big fan of the rain but after all the stinking hot days it made for a welcome change. It also gave us plenty of time for indoor activities such as games and drawing.

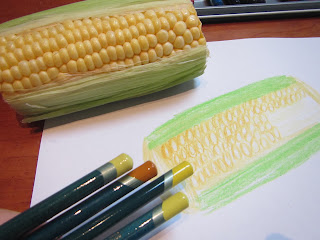
Jasmine and I had fun experimenting with still life drawing, using the lovely two tiered set of Derwent coloured pencils she was given for Christmas. Such beautiful pencils. What a lucky girl! I consider myself pretty fortunate to be able to share them too.

Choosing which fruit and vegies to draw was a fun activity in itself. The choosing process made us stop and think about colour, size, shape and texture of different foods.


Jasmine did a great job drawing the food in front of her. She really studied the different colours and how the light fell on the objects.


We didn't labour on our drawings but instead enjoyed the exploration of colour and form. We liked the moon shape of the rockmelon slices ...


And the dark, rich purples, reds and greens of the plums.


Our final display involved mushrooms, capsicums and celery.


Then the kids decided it was time to eat the display!


Although we didn't create any masterpieces worth framing, I definitely recommend setting up this activity with your kids. It was a relaxing way to spend time and great drawing practice.

Friday 25 January 2013

Fun to grow seeds

Life seems to be busy busy at the moment with my husband travelling for work, painters in my living room and carpet being laid. We haven't had the space for much art and craft. However, we always have to try some sort of activity to keep us entertained. So we retrieved our box of seeds from the top of the kitchen cupboard and explored growing sprouts in different shapes.


We bought the bird seeds from the supermarket. We occasionally put seeds out for the birds in our backyard. I had also heard you can grow them, kinda like alfalfa sprouts, but you can't eat them.


The kids chose their favourite cookie cutter shapes.


We used a plastic tray. Lay 5 sheets of kitchen paper across the tray. Wet thoroughly with water.


 Then sprinkle your seeds. We will keep watering every day or so and see what happens ...

Saturday 19 January 2013

Wooden painted cubby house


This summer holiday, we finally found time to make our much talked about cubby house for the kids. My husband used pallets for the base, left over wood from when he made our pergola and bought some sheets of plywood from the hardware store.


For the windows, the kids requested a butterly and bat cut out. My husband drew the outline with pencil. He then used a jigsaw to cut the holes.

It was amazingly quick and simple.


The kids and I were in charge of painting. There was a bit of debate around colour. Green was a definite but Alex wanted blue and Jasmine purple. In the end we decided that green and purple were a good match to the agapanthas in our garden. I did most of the painting though the kids were really keen to help. The only problem with letting them help was trying to curtail the mess. They managed to drip paint everywhere and totally cover their shoes. Lucky they were wearing their old worn out shoes! In the end I encouraged the kids to paint a spare piece of plywood with their student paints while I focused on the cubby.


We added some pattern by spray painting around leaves. The kids went around the garden collecting a variety of leaves. We used blu-tack to stick the leaves to the walls.


The kids practiced using the spray cans on newspaper first. Again it was a bit tricky for them and messy so I did most of the spraying.


We found some gloves for Jasmine which made it much easier for her to help peal off the leaves without coating her fingers in the smelly paint.


I was recently given a good tip. If you have paint on you and need to use turps to remove it, finish off by squeezing lime on your skin and it removes the smell.

Wednesday 16 January 2013

Memory boxes


We've been distracted again ... enjoying the Summer sunshine and playing at the beach. We've also been busy building and painting a cubby house in the backyard. Once we finish it I will upload some pictures.

On one of our many recent trips to the hardware store for paint and other bits and pieces the kids and I bought two little wooden boxes with a glass lid so we could make display / memory boxes.

Jasmine decided she would decorate her box with textas and put her shells on display.


Alex thought his box should contain lego men. He used blu-tack to stick them to the back board so that he could retrieve the figures when he wanted to use them.


He too decided to add a bit of decoration to his box with texta.


I think the boxes look lovely and using blu-tack means the kids can have fun changing their display from time to time. The boxes can sit on their bookshelf in their bedroom.

Wednesday 2 January 2013

Honeycomb ice cream sandwiches

Summer and ice-cream are pretty much inseparable according to my kids. In fact, they would be willing to eat ice-cream in winter too, provided they could sit in front of the heater while doing this.
We tried a new recipe today which is so delicious we'd like to share it. It is super simple too. We found the recipe at To Food With Love blog.

Ingredients:
  • 1 packet rectangular-shaped biscuits
  • 1 1/4 cup thickened/heavy whipping cream
  • 5 tbsp condensed milk
  • 1 chocolate bar (Crunchie, Violet crumble, or Cherry Ripe if you prefer), roughly chopped
Method:
1. Add thickened cream and condensed milk to a mixing bowl.

2. Whip until stiff using an electric beater.

  
3. Chop violet crumble and add to mixture.


4. Pour into tin lined with glad wrap and freeze for at least 8 hours.


5. Defrost slightly, slice and add to your favourite biscuits. We used Milk Arrowroots.


We froze the ice-cream separately to the biscuits however you can add a layer of biscuits on either side of the ice-cream and freeze together if you like. Leave for 8 hours and then slice into separate "sandwiches".
Enjoy!