Tuesday 30 April 2013

Ten black dots

The kids and I recently discovered the book "Ten Black Dots" by Donald Crews. It is a fabulous book about all the different things you can make with dots. For example, "three dots can make a snowman's face" and "Five dots can make buttons on a coat". 


We bought some dot stickers from the supermarket and spent some time creating our own pictures.


Jasmine made a flower.


And a lady with a necklace.


Alex made a volcano.


We also made spotty cats and butterflies.


What would you make with sticky dots?

Thursday 25 April 2013

Clay trophy

My kids have been seriously focused on winning a trophy at the moment. I think they discovered trophies at school.

They think all good behaviour should be rewarded with a trophy - getting dressed, brushing your teeth, saying please and thank you, anything really ....

My husband found some of his old sailing and skiing trophies while cleaning out the shed recently. The kids have these on display in their bedroom.

However, Alex and Jasmine also wanted to make their very own trophy to win. We decided to make one out of air drying clay using the pinch pot method. We have used this method before to make a tea set.


Once the clay had dried overnight, Jasmine painted the trophy with yellow student acrylic paint and added some stickers.


The clay trophy is awarded each night at bedtime for the person who can lie the stillest and calmest in their bed and be the "Relaxation Winner". So far I am the winner! I wonder who will be the person who gets handed the trophy next?

Saturday 20 April 2013

Creating with Quicksticks tape and boxes

Over the school holidays we've been making more creations with Quicksticks tape, recycled boxes and tubes. You might have seen my earlier post when we first discovered this super kid-friendly silver craft tape.

I left a bunch of different boxes on our playroom table, together with some scissors, coloured paper, textas and fluffy pipe cleaners. The kids made the following:

1. A crocodile

 2. A kingdom


3. A birthday cake

 4. A torch


 5. A princess palace


6. Binoculars

7. Televisions

Tuesday 16 April 2013

Wet felt bowl hats

I recently did a wet felting class at Ikke in Crows Nest. I have always admired felt products but wasn't sure how hard or easy it would be to make them myself. The class was for adults but I knew my daughter would like to try it out too. Thankfully it wasn't too tricky and actually quite therapeutic. So I used my newly acquired skills and knowledge to teach her how to make what we call a "bowl hat". This is because we can't decide if it makes a better bowl or a hat! We used the following materials:
  • coloured wool strands (bought from Ikke but also available at Spotlight or on the internet)
  • balloon
  • bowl
  • dishwashing liquid
  • synthetic fabric
  • scissors.
This is the one I made at Ikke.


This is the one Jasmine and I made together.


We also made a couple of red, white and orange ones but we were impatient with these ones and they are a bit flimsy. I have definitely learnt that you can't rush the felting process just because you are desperate to see what the final product will look like!

We trialled putting the two flimsy red ones together, adding buttons and a ribbon and using it as a bag.


To make a felted bowl hat or bag yourself, follow the steps below. You can thank the ladies at Ikke for these techniques.

Step 1: Blow up a balloon and rest in a bowl. Use your haand to smear the balloon with dishwashing liquid.


Step 2: Pull apart wool strands and spread out over the balloon. Try to keep the wool even and not let it clump.

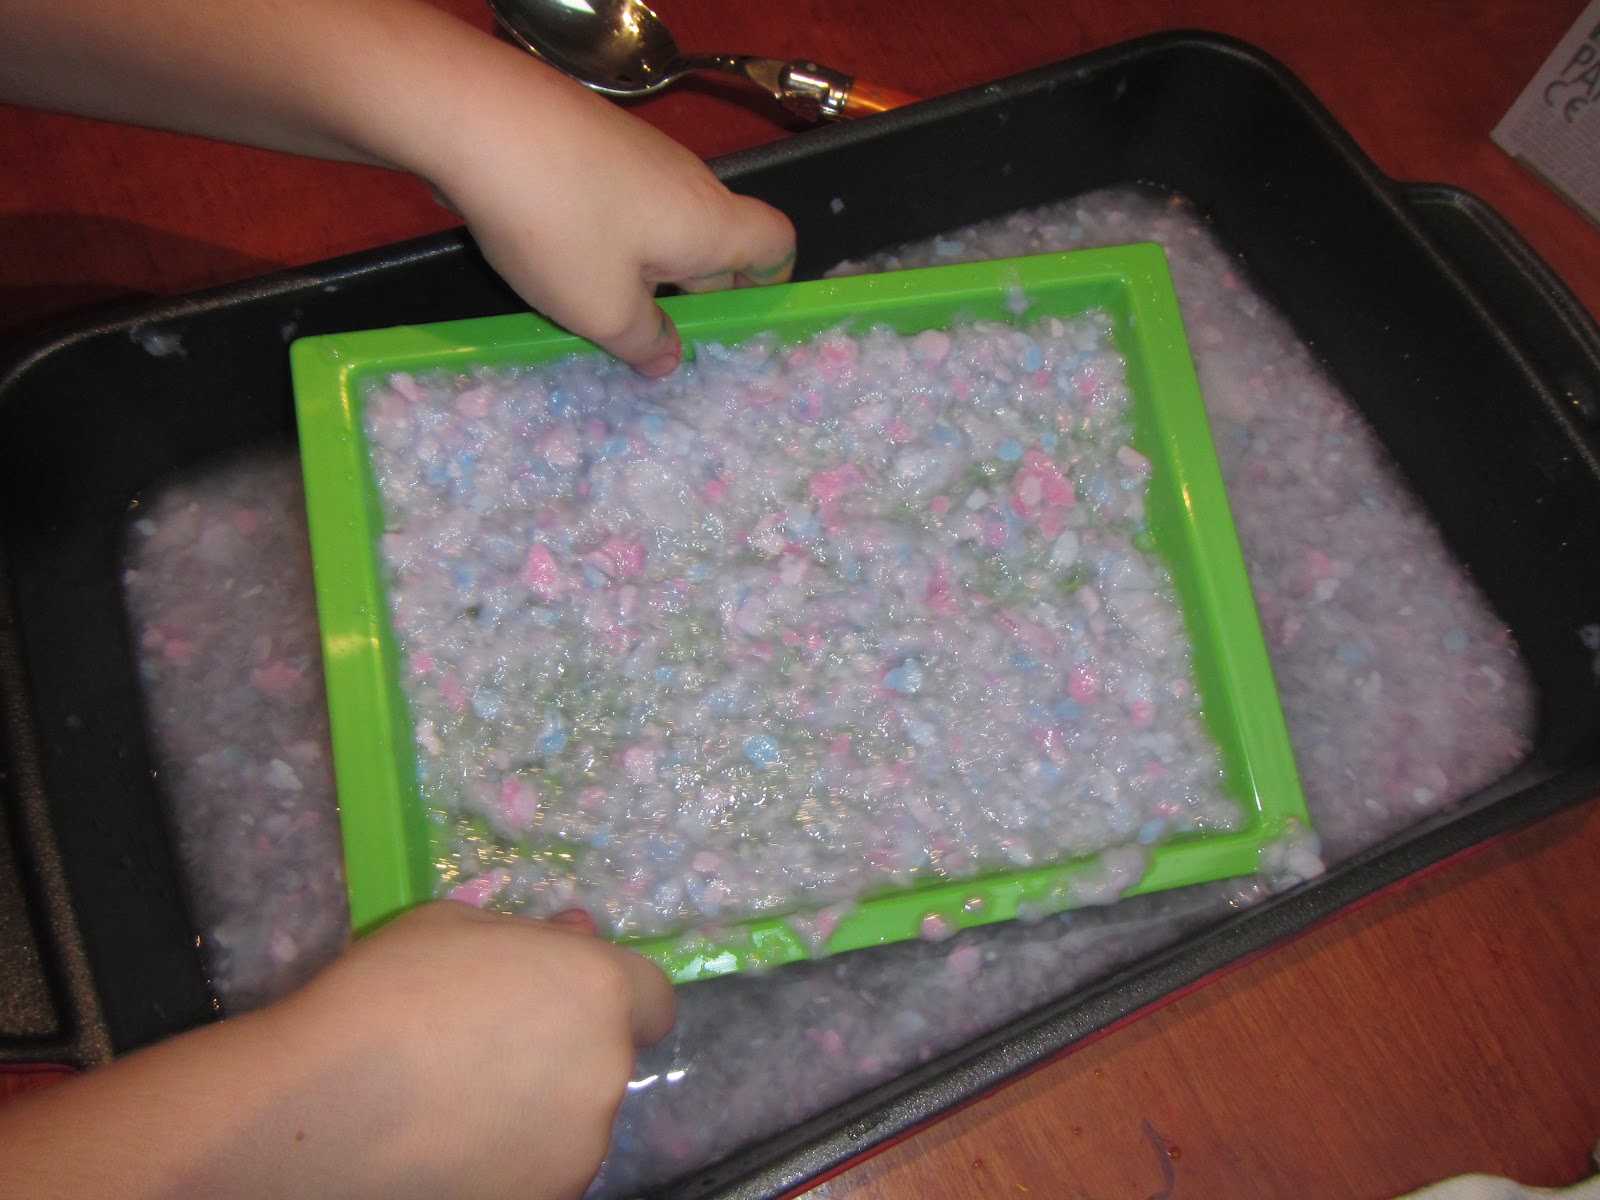
Step 3: Pat down periodically with your hands and cover the balloon well. Make sure there are no gaps. The balloon should look like a crazy wig from the 80s. If you want different colours on the outside and inside of the bowl you will have to make two layers of colour. In the pictures below we used the same colour combination inside and out.

Step 4: Cover the fluffy balloon with synthetic, sheer fabric and turn upside down. Only synthetic, sheer fabrics should be used. The water needs to be able to soak through the fabric. Cotton and other natural fibres are not suitable as these will stick to the felt.

Step 5: You can then add extra wool to the bottom of the balloon if you would like a deeper bowl. Once finished, tie the fabric over the top of the balloon.

Step 6: Put another layer of fabric over the balloon and tie on the opposite side. This will ensure the wool is held in place over the balloon. Add soap and warm water and massage the felt over the balloon. Rub for several minutes. You can dip in hot water to help shrink the felt and aid with the felting process.

Step 7: Remove the sheer fabric. You may need to smooth out some bumps or keep rubbing the felt with soapy water to ensure smooth coverage.

Step 8: Once you are happy with the look of the felt, cut the balloon and remove it. You can then leave the felt to dry. On warm days it will dry in 30 minutes. You can trim the edges if you prefer a straighter finish.

If you are feeling hesistant to try on your own, I would highly recommend doing a class at Ikke. They are great teachers and their store has the most lovely, creative things for sale.

Thursday 11 April 2013

Peter Clark Collage

We've been really enjoying making collages after school this week. We came across the work of Peter Clark. Have a look at his work below and on the following website. He creates some amazing stuff: http://www.peterclarkcollage.com/pages/home.html


For our collages I prepared all sorts of papers including images cut out of magazines, old maps, cards, Easter egg wrappers, tissue paper and scrapbook paper. I asked the kids what pictures they would like to make and then drew outlines on white sheets of paper - a bird, frog, fish, turtle, butterfly and panda. It is a nice simple activity once you have all your papers ready. We used glue sticks and scissors and had a good time mixing colours, patterns and playing around with designs.


Thursday 4 April 2013

Make your own paper

I have always wanted to try and make my own paper so when I saw a paper making kit at a local shop recently of course I couldn't resist.


The kit included:
  • a plastic tray
  • two sheets of plastic mesh
  • some paper
  • instructions
In addition I used:
  • newspaper
  • tea towels
  • water bottle
  • warm water
  • oven tray

It was useful having the kit as I am a total beginner when it comes to making paper. However, it was remarkably easy and you could source your own plastic tray and mesh from other stores such as a $2 shop.

Step 1: Tear up pieces of scrap paper into 2cm squares.


Step 2: Fill 2/3 water bottle with warm water and paper bits. Leave 24 hours to soak.

Step 3: Shake bottle vigorously until mixture resembles porridge.


Step 4: Prepare oven tray, plastic tray and mesh sheets. Pour contents of water bottle into oven tray. Add some more water.


Step 5: Dip plastic tray and one layer of plastic mesh into the paper porridge mixture.


Step 6: Put second layer of plastic mesh over the top of the plastic tray. Squeeze out excess water.

Step 7: Carefully lift or tip paper onto tea towel. Use sponge to remove excess water.


Step 8: Remove plastic mesh and leave paper in between layers of tea towels and newspaper to dry for at least 12 hours.


Step 9: Remove from tea towels and leave to dry some more in open air. Once dry it is ready to make into a book, poster or cut up and decorate a card.